The doors, where you will install the access control devices on, must be configured in the program. Indicate the name of the door (or the location) and the type of the installed electronic device (elettronic lock, wall reader, elettronic cylinder).
The doors can be grouped into areas for a more convenient management of the plant in case of large numbers of accesses (for example, they might be grouped by floor). If you think you might benefit from grouping your doors in areas, you had better setting up the areas before adding the doors. Click here to learn how to set up the areas.
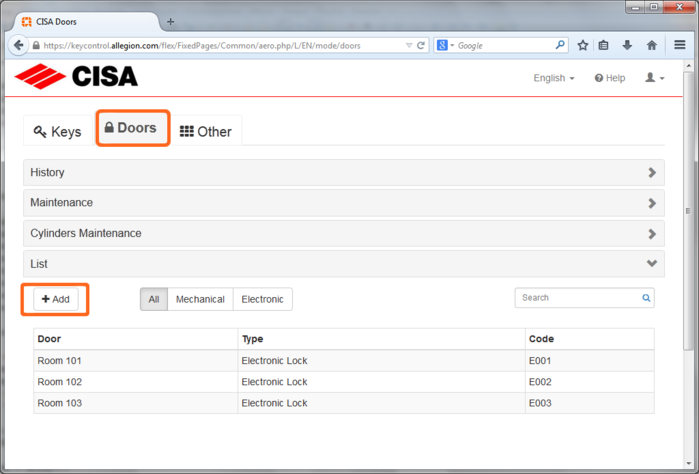
Click on Doors tab, then on Add button.
It starts a wizard that allows you to configure the new door.
Door name
Fill in the door/room name (there are no limits, but we recommend to chose a short name, for example the room number: 101, 102, ...).
Specific for AERO X version |
Guest room If you have the complete package AERO X, for each door you must specify if it is a "Guest room" (a room dedicated to host a customer in an exclusive way - typically the bedroom), because for these rooms there are functions that allow to program cards for your guests in a quicker and more secure way. Set "Guest room = Yes" for the bedrooms, "Guest room = No" for other doors (external gates/doors, gymn, offices, SPA, conference rooms, ...) |
Pre-selected for guests If you are configuring a common access, for example the main entrance (which means that you have chosen "Guest room = No"), you might desire that this access is operated by default from your guests. If this is the case, it will be convenient to set "Pre-selected for Guest Cards = Yes"; on the other hand, if your guests will not need to operate this door, or will be allowed only if they choose specific services (for example the Gymn), you can leave "Pre-selected for Guest Cards = No". If you set Yes, each time you start programming a Guest Card, this door will be automatically included among the doors operated. In any case it will always be possible to de-select the door if for any reason it shall not be operated by a customer. |
Specific for AERO Multi-user version |
Private rooms Set to "Yes" the Private room selector to mark the room as Private. Unauthorized users (e.g., receptionists, general staff) will not be allowed to create or manage credentials for rooms flagged as "Private". This ensures that only authorized personnel can issue keys to these rooms, enhancing security for sensitive areas within the hotel. Private Rooms are intended for utilities, not for guest rooms. Click here to learn more on Private rooms. |
If you have configured the areas to split your doors in smaller groups, here you can select the area to which this door belongs (for example "Main building - First floor"). Choose the area from the drop down list.
If you have not configured the areas, you will not see the Area section.
Lock type
Select the type of the electronic device installed in this door.
The type can be:
Office function
There are cases when you might wish to set a device in open state, so that it is not necessary to present any credential for access: for example, the main entrance during day, or the door of a conference room during a conference, or an office during work time.
If you want to allow this functionallity, the electronic device must be configured and you must select "Office function = Yes".
Nota Bene: choosing Yes you allow this functionallity, but the open state will be activated and de-activated using access cards opportunely programmed.
Open time
If the lock type is a Wall-reader, you can configure the opening time.
Enter the opening time in tenths of seconds in the field Open time.
For example, if you enter the value 20, the opening time will be 2 seconds.
The opening time is configured in the device when it is initialized, so in case you need to change it, a reset and re-initialization is required.
The opening time cannot be modified for electronic cylinders and locks for which it is always 5 seconds.
Automatic Dead Bolt
If the lock type is an Electronic Lock, you must tell if the lock is equipped with an Automatic Dead Bolt or not.
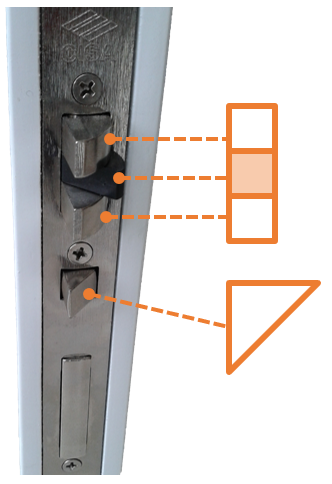
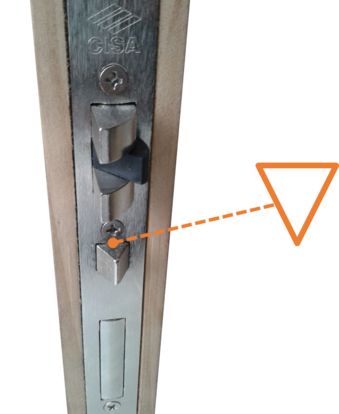
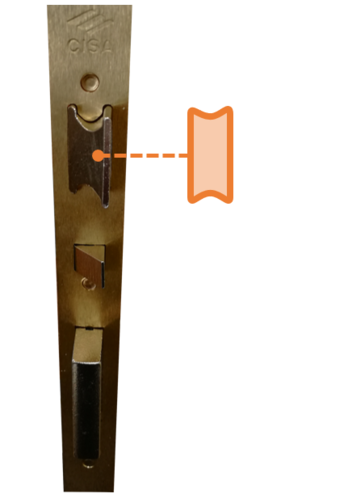
Look at the door from the front side, and focus on the latch and the small piston below the latch as highlighted in the pictures below.
If the shape of the piston (from above) is a rectangular triangle and the latch is split in 3 parts, then Automatic Dead Bolt = YES.
If the shape of the piston (from above) is an isosceles triangle, or the latch is one single part, then Automatic Dead Bolt = NO.
The eSIGNO 2.0 and Wall Reader BLE devices are equipped with the Bluetooth Low Energy (BLE) technology: it is now possible to open these locks with a smartphone.
If you have a subscription AERO Smart Access, that allows to create keys for smartphones, you shall activate BLE in your locks.
Otherwise, it is convenient to keep BLE off, so that battery life is preserved.
Select "Yes" in the switch called "BLE module" to activate the BLE of the device.
The BLE configuration is applied in the lock with the INIT card. If the lock was already configured without BLE, it is required to reset and re-initialize the lock to apply the new configuration.
In case the BLE is activated, 3 additional parameters can be configured.
Note: the 3 additional BLE parameters are not yet processed by the locks, since the current firmware blocks these values to the default ones, independent of the GUI choices. KEEP DEFAULT VALUES.
Parameter |
Default |
List of values |
Performances |
|---|---|---|---|
BLE wake-up |
Automatic |
Automatic/Manual |
AUTOMATIC: the BLE is always on. MANUAL: the BLE must be waked-up moving a hand close to the antenna. This setting allows to augment battery life, but it is less simple for users. |
BLE advertising (ms) |
800 |
800 / 500 / 300 |
This parameter affects the speed of lock detection. 300 ms allows quicker detection. 800 ms could require half a second more. 800 ms allows a longer battery life, since this parameter impacts significantly the battery consumption (approx. 50% more from one level to the other). |
BLE power (dBm) |
-12 |
-60 / -12 / 0 |
This parameter affects the average distance of lock detection. 0 dBm stands for higher power, thus higher distance (approx. 4 times more than -12 dBm), while -60 dBm reduces by 4 times the distance vs -12 dBm. Higher power reduces battery life. |
When you are done, click on Next.
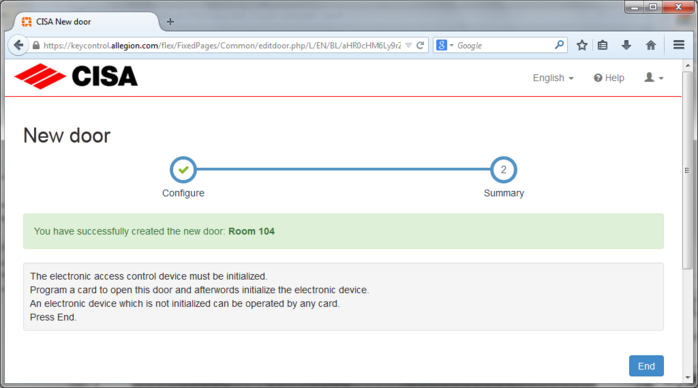
A summary is displayed, which reminds you that the electronic device of this door will have to be initialized.
Click on End button.
The door, that you have just created, is displayed in the doors list.
Now you can program the keys that will open this door.
You can modify at any time the door (name, type of device), but it is not possible to delete it.
Only in case you change the setting for the Office Function, you need to reset and re-initialize the door.